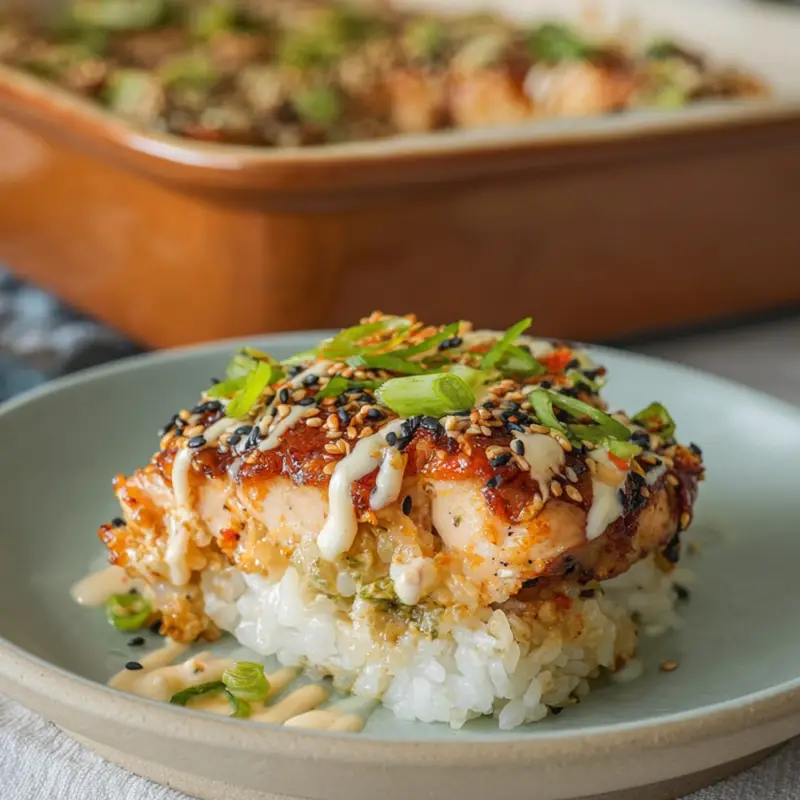
This Spicy Salmon Sushi Bake brings together creamy salmon, perfectly seasoned sushi rice, and all your favorite sushi toppings in one bubbly casserole. I first tried a version of this at my friend Alex's potluck last spring, and I've been hooked ever since-it has all the flavor of your favorite spicy salmon roll without any of the fussy rolling.
If you're craving something bold and satisfying like my Spicy Brazilian Coconut Chicken or my Buffalo Chicken Wraps Recipe, this easy Spicy Salmon Sushi Bake recipe will quickly become your new weeknight favorite. The best part? It's naturally gluten-free and comes together in about 40 minutes, which means you can have restaurant-quality sushi on the table faster than delivery.
What is Sushi Bake?
Sushi bake is a deconstructed sushi casserole that layers seasoned sushi rice with a creamy, flavorful topping-in this case, Spicy Salmon Sushi Bake mixed with cream cheese, mayo, and sriracha. Instead of rolling individual pieces, everything gets pressed into a baking dish and baked until warm and bubbly. You scoop it onto crispy nori sheets like you're making your own hand rolls, and it's honestly one of the most fun ways to enjoy sushi at home.
This Spicy Salmon Sushi Bake became wildly popular during the pandemic when people were looking for creative ways to enjoy restaurant favorites at home. It's easier than traditional sushi, feeds a crowd, and lets everyone customize their bites with toppings like avocado, cucumber, and green onions.
Jump to:
Spicy Salmon Sushi Bake Ingredients
Here's everything you need to make this Spicy Salmon Sushi Bake at home.
See Recipe Card Below This Post For ingtedient Quantites
Sushi Rice:
- Sushi rice: This short-grain rice gets sticky and tender when cooked, which is essential for holding everything together in the baking dish.
- Rice wine vinegar: Adds that classic tangy sweetness you expect from sushi rice.
- Sugar: Balances the acidity of the vinegar and gives the rice a subtle sweetness.
- Salt: Enhances all the flavors and keeps the rice from tasting flat.
Salmon Mixture:
- Furikake seasoning: This Japanese rice seasoning adds umami, a touch of nori flavor, and a little crunch. You'll sprinkle it over the rice layer.
- Salmon fillets: Fresh or thawed salmon works beautifully here. Two portions (about 8 oz total) give you plenty of creamy, flaky salmon for the topping.
- Soy sauce (or tamari): Seasons the salmon before cooking and adds a savory depth. Use tamari if you need this to be gluten-free.
- Cream cheese: Softened cream cheese makes the salmon mixture rich and smooth, almost like the filling in a spicy salmon roll.
- Mayonnaise: Kewpie mayo is my favorite for its slightly sweet, tangy flavor, but regular mayo works great too.
- Sriracha sauce: Brings the heat and that signature spicy kick. You can swap in sambal oelek if you prefer a different kind of heat.
Toppings:
- Avocado: Adds creamy richness and a buttery texture that balances the spice.
- Cucumber: Provides a cool, crisp contrast to the warm, creamy salmon.
- Green onions: Fresh and bright, these add a little bite and color.
- Nori seaweed sheets: Cut into squares for scooping-these turn each bite into a little hand roll.
- Kewpie mayo: Drizzle extra on top for richness.
- Unagi sauce: Sweet and savory, this is the perfect finishing touch.
How to Make Spicy Salmon Sushi Bake
This Spicy Salmon Sushi Bake comes together in three easy steps: rice, salmon, and assembly.
Sushi Rice:
Rinse the rice: Using a fine-mesh sieve, rinse the sushi rice thoroughly under cold water until the water runs clear. This removes excess starch and helps the rice cook up fluffy and tender.
Cook the rice: Cook the rinsed rice according to the package instructions, usually about 19 minutes. The rice should be sticky and slightly glossy when done.
Season the rice: Once cooked, sprinkle the rice vinegar, sugar, and salt over the warm rice. Use a rice paddle or spatula to gently fold and mix everything together. The rice should smell tangy and sweet.
Salmon Mixture:
Prepare the salmon: Season the salmon fillets by rubbing them all over with soy sauce. Let them sit for a minute while you preheat your air fryer or oven.
Cook the salmon: Air fry the fillets at 400°F for about 10 minutes, or bake in the oven at 400°F for 15 to 18 minutes, depending on thickness. The salmon should flake easily with a fork and look opaque throughout. You can do this step while the rice is cooking to save time.
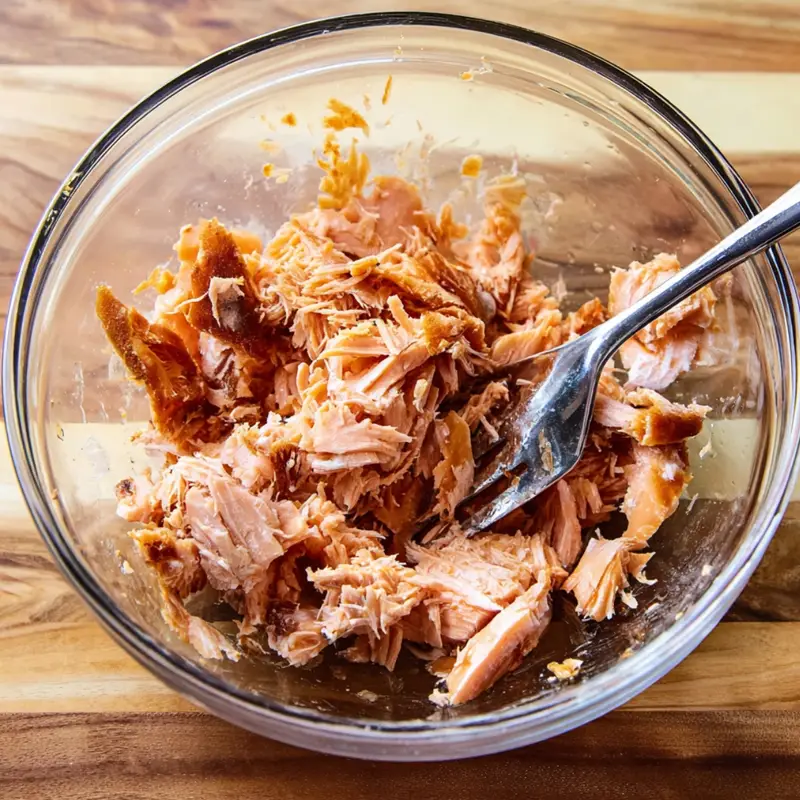
Flake the salmon: Once the salmon is cooked and slightly cooled, use a fork to break it into small, bite-sized pieces. Don't worry if some pieces are bigger than others-it adds texture.
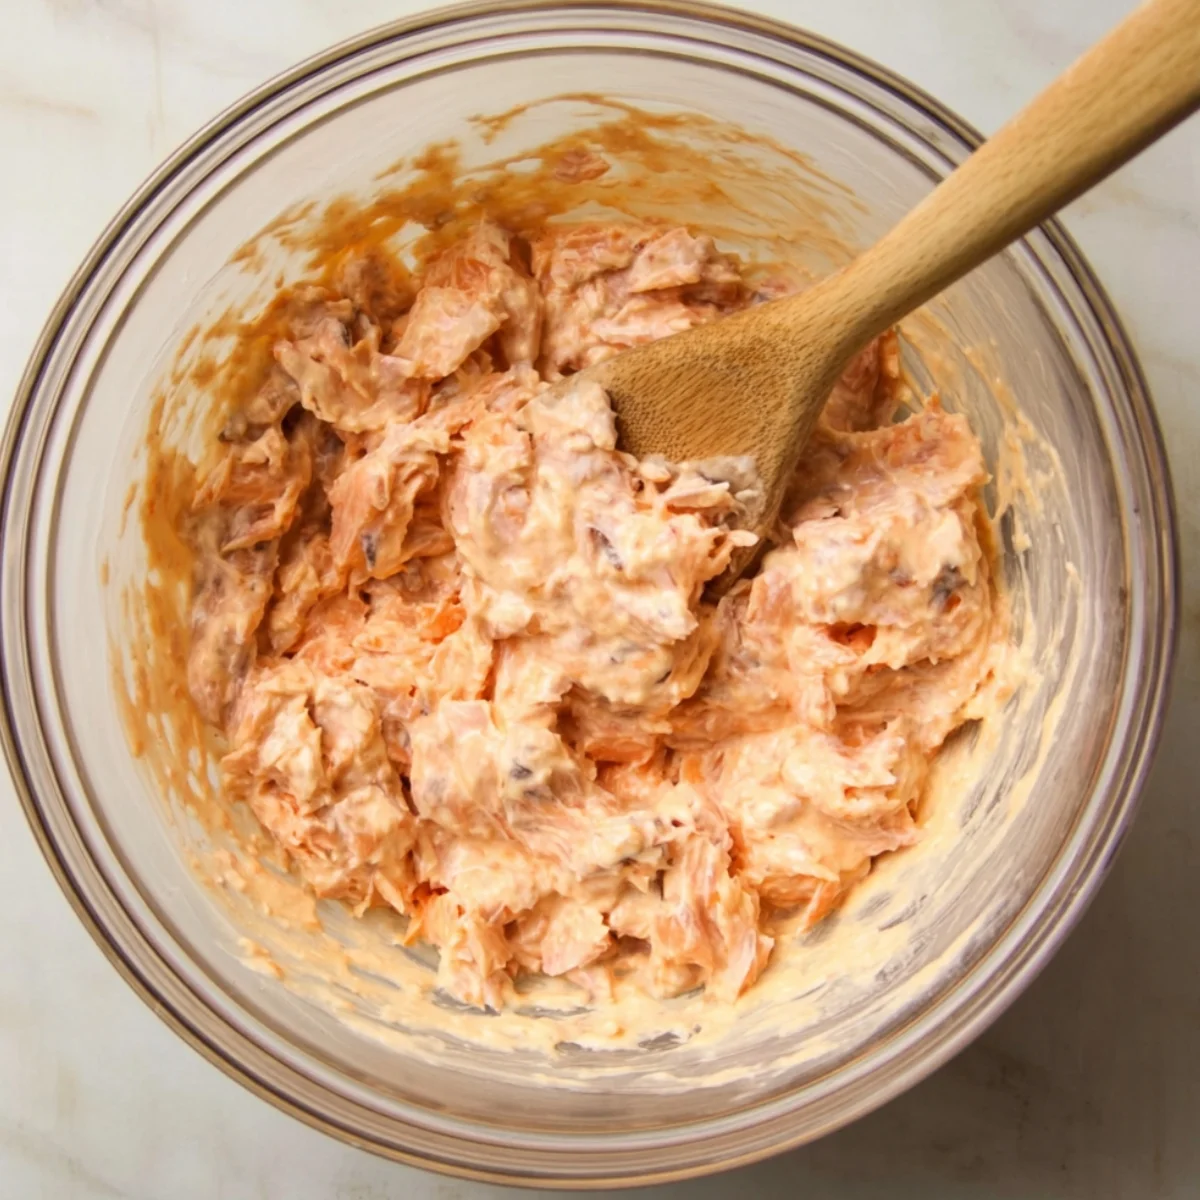
Combine the filling: In a large bowl, mix the flaked salmon with softened cream cheese, mayonnaise, and sriracha sauce. Stir until everything is creamy and well combined. The mixture should be spreadable and slightly spicy.
Assembly:
Preheat the oven: Preheat your oven to 425°F. Line a 9x9-inch baking dish with parchment paper or give it a light spray with cooking spray.
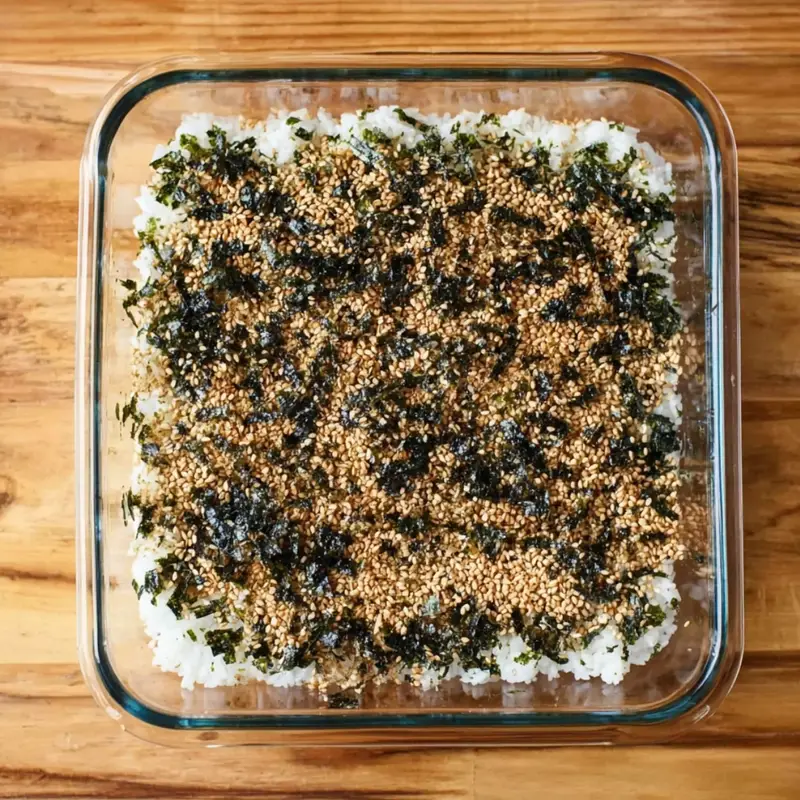
Layer the rice: Press the seasoned sushi rice evenly into the bottom of the prepared baking pan. Use the back of a spoon or your rice paddle to pack it down gently. Sprinkle the furikake seasoning over the rice for extra flavor and crunch.
Add the salmon: Spread the creamy salmon mixture evenly over the rice layer. It should cover the rice completely, edge to edge.

Bake: Bake for 14 to 16 minutes, or until the casserole is heated through and bubbling slightly around the edges. The top should look creamy and golden in spots.
Top and serve: Remove from the oven and drizzle with extra Kewpie mayo and unagi sauce. Sprinkle with sliced green onions, cubed avocado, and cucumber. Serve warm with squares of nori sheets on the side for scooping.
Substitutions and Variations
- No air fryer? Just bake the salmon in the oven at 400°F for 15 to 18 minutes. It works just as well.
- Swap the protein: Try canned tuna, imitation crab, or cooked shrimp instead of salmon for a different take on this sushi-inspired casserole.
- Adjust the spice: Cut back on the sriracha or use a milder hot sauce if you're serving kids or prefer less heat. You can also add more sriracha if you like it extra spicy.
- Add-ins: Fold in some diced mango, edamame, or pickled ginger for extra flavor and texture.
- Make it vegan: Use plant-based cream cheese and mayo, and swap the salmon for marinated tofu or roasted sweet potato.
Equipment For Spicy Salmon Sushi Bake
- 9-inch casserole dish or 9x9-inch baking pan: This is where all the magic happens. Make sure it's oven-safe.
- Fine-mesh sieve: Essential for rinsing the rice and getting rid of excess starch.
- Air fryer (optional): Makes the salmon cook faster and gives it a nice texture, but the oven works perfectly too.
- Rice paddle or spatula: Helps you fold the rice gently without smashing the grains.
- Large mixing bowl: For combining the creamy salmon mixture.
Storage and Reheating Tips
Refrigerator: Store leftover Spicy Salmon Sushi Bake in an airtight container in the fridge for up to 3 days. The rice will firm up a bit when cold, but it still tastes great.
Freezer: You can freeze this for up to 1 month, though the texture of the rice and toppings may change slightly. Freeze in individual portions for easy reheating.
Reheating: Warm it in the oven at 350°F for about 10 minutes, or microwave individual portions for 1 to 2 minutes. Add fresh toppings like avocado and cucumber after reheating for the best texture and flavor.
Serving Suggestions
This Spicy Salmon Sushi Bake is hearty enough to serve on its own, but here are a few ideas to round out the meal:
- Serve with a simple side of miso soup and edamame for a full Japanese-inspired dinner.
- Pair it with a crisp cucumber salad dressed with rice vinegar and sesame oil.
- Add some steamed broccoli or snap peas on the side for extra veggies.
- Serve alongside my Cottage Cheese Taco Bowl Recipe if you're feeding a crowd with different tastes.
Expert Tips
- Use fresh salmon if possible: Fresh salmon has the best flavor and texture, but high-quality frozen salmon works great too. Just thaw it completely before cooking.
- Don't skip rinsing the rice: This step removes excess starch and keeps the rice from getting gummy. It only takes a minute and makes a big difference.
- Let the salmon cool slightly before mixing: If the Spicy Salmon Sushi Bake is too hot, it can make the cream cheese too runny. Let it cool for a couple of minutes first.
- Press the rice firmly: You want a solid base layer that won't fall apart when you scoop it. Use the back of a spoon to pack it down evenly.
- Cut the nori into squares: Small squares are easier to handle and make perfect little scoops for each bite.
- Add toppings right before serving: The avocado and cucumber stay freshest when added at the last minute.
FAQ
What are the origins of the sushi bake?
Spicy Salmon Sushi Bake is believed to have originated in the Philippines, where it became a popular potluck dish. It's a creative, easy way to enjoy sushi flavors without the skill or time required for traditional rolling. The dish spread through social media and quickly became a favorite in home kitchens everywhere.
Should sushi bake be eaten hot or cold?
Spicy Salmon Sushi Bake is best enjoyed warm, right out of the oven when the rice is soft and the salmon topping is creamy and slightly bubbling. That said, some people enjoy the leftovers cold, straight from the fridge. Try it both ways and see what you prefer-my family loves it warm with fresh, cool toppings on top.
How do you eat baked sushi?
Use a square of nori seaweed as a scoop. Spoon a portion of the Spicy Salmon Sushi Bake onto the nori, add your favorite toppings like avocado and cucumber, fold it up like a little taco, and enjoy. It's fun, interactive, and everyone can customize their bites.
Is Spicy Salmon Sushi Bake gluten-free?
Yes, this Spicy Salmon Sushi Bake is naturally gluten-free as long as you use tamari instead of regular soy sauce. Double-check your furikake seasoning and other ingredients to make sure they don't contain any hidden gluten. Most versions of this dish are safe for gluten-free diets.
Related
Looking for other recipes like this? Try these:


Pairing
These are my favorite dishes to serve with Spicy Salmon Sushi Bake


Spicy Salmon Sushi Bake
Ingredients
- 1 cup sushi rice Short-grain rice preferred for stickiness
- ¼ cup rice wine vinegar Adds tangy flavor to rice
- 2 teaspoons sugar Balances the vinegar
- 1 teaspoon salt Enhances the flavor
For the Salmon Mixture:
- ½ cup furikake seasoning Japanese seasoning blend with seaweed and sesame seeds
- 9 oz salmon fillets Fresh or frozen two portions
- 1 tablespoon soy sauce Use tamari for gluten-free option
- ¼ cup cream cheese Softened for easy mixing
- ¼ cup mayonnaise Kewpie for authenticity or regular mayo
- 2 tablespoons sriracha sauce Adjust to taste for spice level
For the Toppings:
- 1 avocado Sliced or cubed
- ½ cucumber Sliced or cubed
- 2 green onions Sliced
- Nori seaweed sheets For serving
- Extra kewpie mayonnaise For drizzling
- Unagi sauce For drizzling
Instructions
- Rinse the sushi rice under cold water using a fine mesh sieve until the water runs clear.
- Cook the rinsed rice following package instructions, typically around 20 minutes.
- Once the rice is cooked, mix in the rice vinegar, sugar, and salt using a rice paddle or spatula.
- For the salmon mixture, rub the salmon fillets with soy sauce.
- Cook the fillets in an air fryer at 400°F for 10 minutes or bake in a preheated oven at 400°F for 15-20 minutes. (Cook while rice is finishing.)
- Break the cooked salmon into small pieces with a fork.
- In a large bowl, combine the salmon, cream cheese, mayonnaise, and sriracha sauce, mixing well.
- Preheat the oven to 425°F. Line a 9x9-inch baking dish with parchment paper or spray with cooking spray.
- Evenly press the sushi rice into the prepared baking pan, then sprinkle with furikake seasoning.
- Spread the salmon mixture evenly over the rice.
- Bake for 15 minutes or until the dish is heated through and slightly bubbling.
- Top with extra mayonnaise, green onion slices, avocado, and cucumber.
- Serve with squares of nori seaweed sheets for wrapping.


Leave a Reply