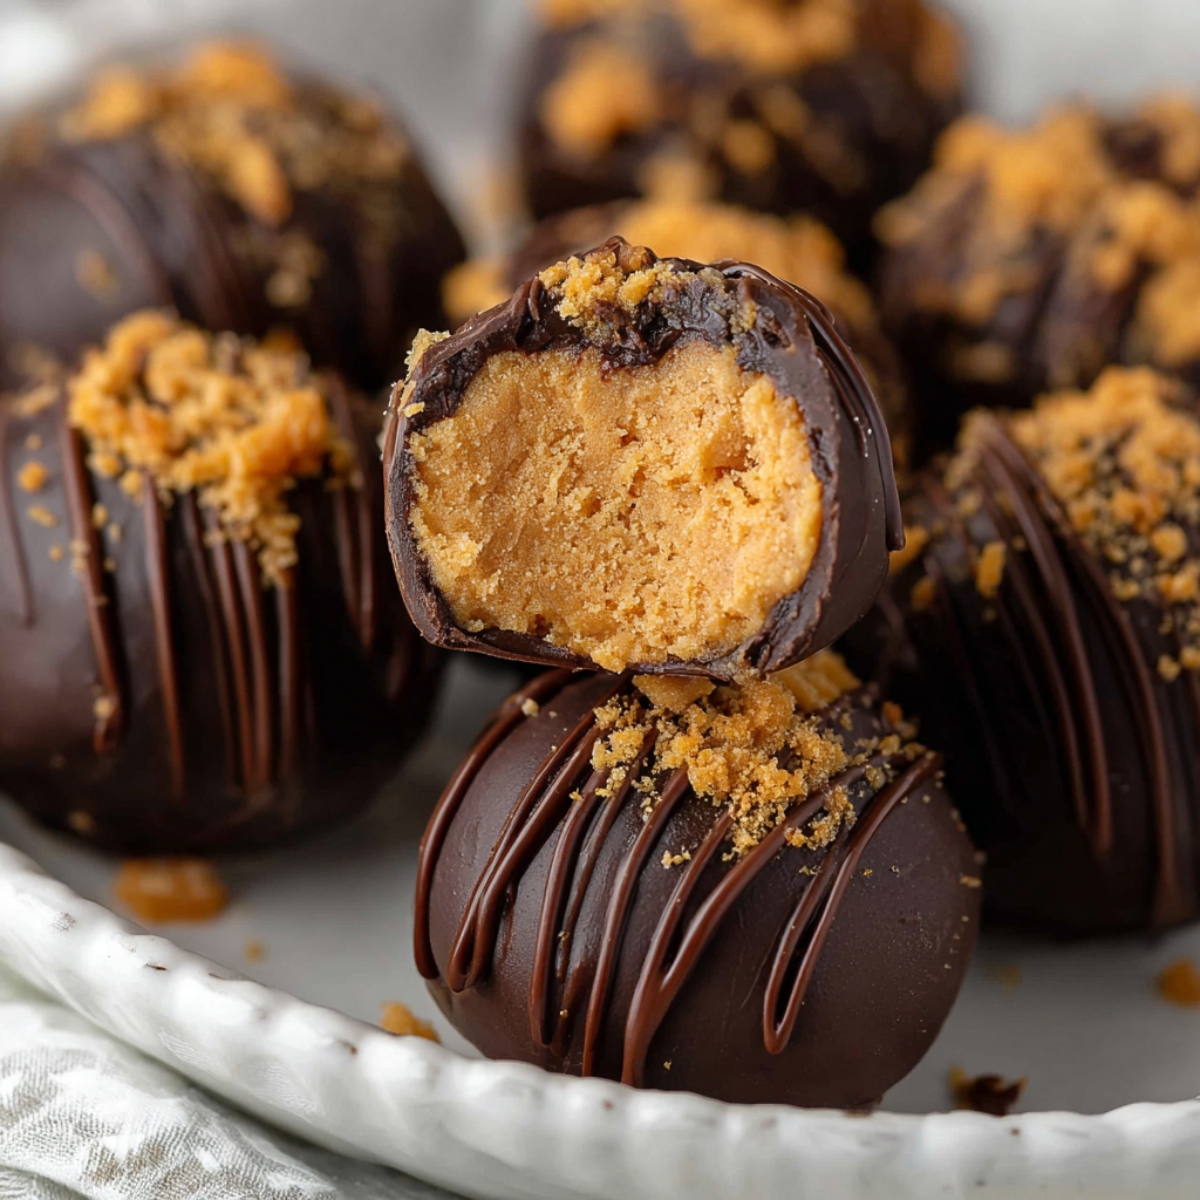
These creamy, no-bake Butterfinger Balls are packed with peanut butter richness and crunchy candy bits, then dipped in smooth chocolate. Every bite delivers that signature sweet-salty crunch you crave, and they come together in about 45 minutes with no oven required.I first made these for Oliver's school holiday party last year, and honestly, I wasn't sure how they'd turn out. The mixture looked a little crumbly at first, but once I rolled them and let them chill, they firmed up beautifully.

If you're looking for simple ingredients and bakery-style results at home, this is your recipe. They're also perfect alongside other easy treats like Magic Cookie Bars Recipe or Mini Margarita Cheesecakes Recipe when you need a dessert spread that feels festive without the stress.
Why You'll Love This Butterfinger Balls
Butterfinger Balls are one of those desserts that look fancy but couldn't be easier to pull off. You don't need any special skills, just a mixer and about 15 minutes of hands-on time. The peanut butter base is smooth and sweet, the crushed Butterfingers add texture, and the chocolate coating makes them feel like something from a candy shop. They're great for holiday cookie trays, birthday parties, or wrapping up as gifts. Plus, since they're no-bake, you can make them even when it's too hot to turn on the oven.
Jump to:
Butterfinger Balls Ingredients
Here's everything you need to make these Butterfinger Balls, crunchy treats.
See Recipe Card Below This Post For Ingredient Quantities
- Creamy peanut butter: Forms the rich, smooth base of the filling. Stick with regular brands like Jif or Skippy, not the all-natural kind, which can be too oily.
- Butter, softened: Adds richness and helps bind everything together. Room-temperature butter blends more easily.
- Vanilla extract: Brings a warm, sweet note that balances the peanut butter.
- Powdered sugar: Sweetens the mixture and gives it structure without graininess.
- Graham cracker crumbs: Adds a subtle honey-like flavor and helps firm up the filling.
- Crushed Butterfinger bars: The star ingredient. These give every bite that signature crunchy, peanut buttery flavor.
- Chocolate bark or chocolate chips: Creates the smooth outer coating. Chocolate bark melts beautifully and sets with a nice shine, but you can use tempered chocolate chips too.
- Garnish: Extra crushed Butterfingers, holiday sprinkles, or a pinch of flaky sea salt add the finishing touch.
How to Make Butterfinger Balls
Let me walk you through how to make these step by step.
Make the peanut butter mixture: Add the peanut butter and softened butter to a medium bowl. Beat with an electric mixer on medium speed for about a minute until well combined and creamy. You can also use a stand mixer with the paddle attachment if you prefer. Add the vanilla extract and blend until smooth.
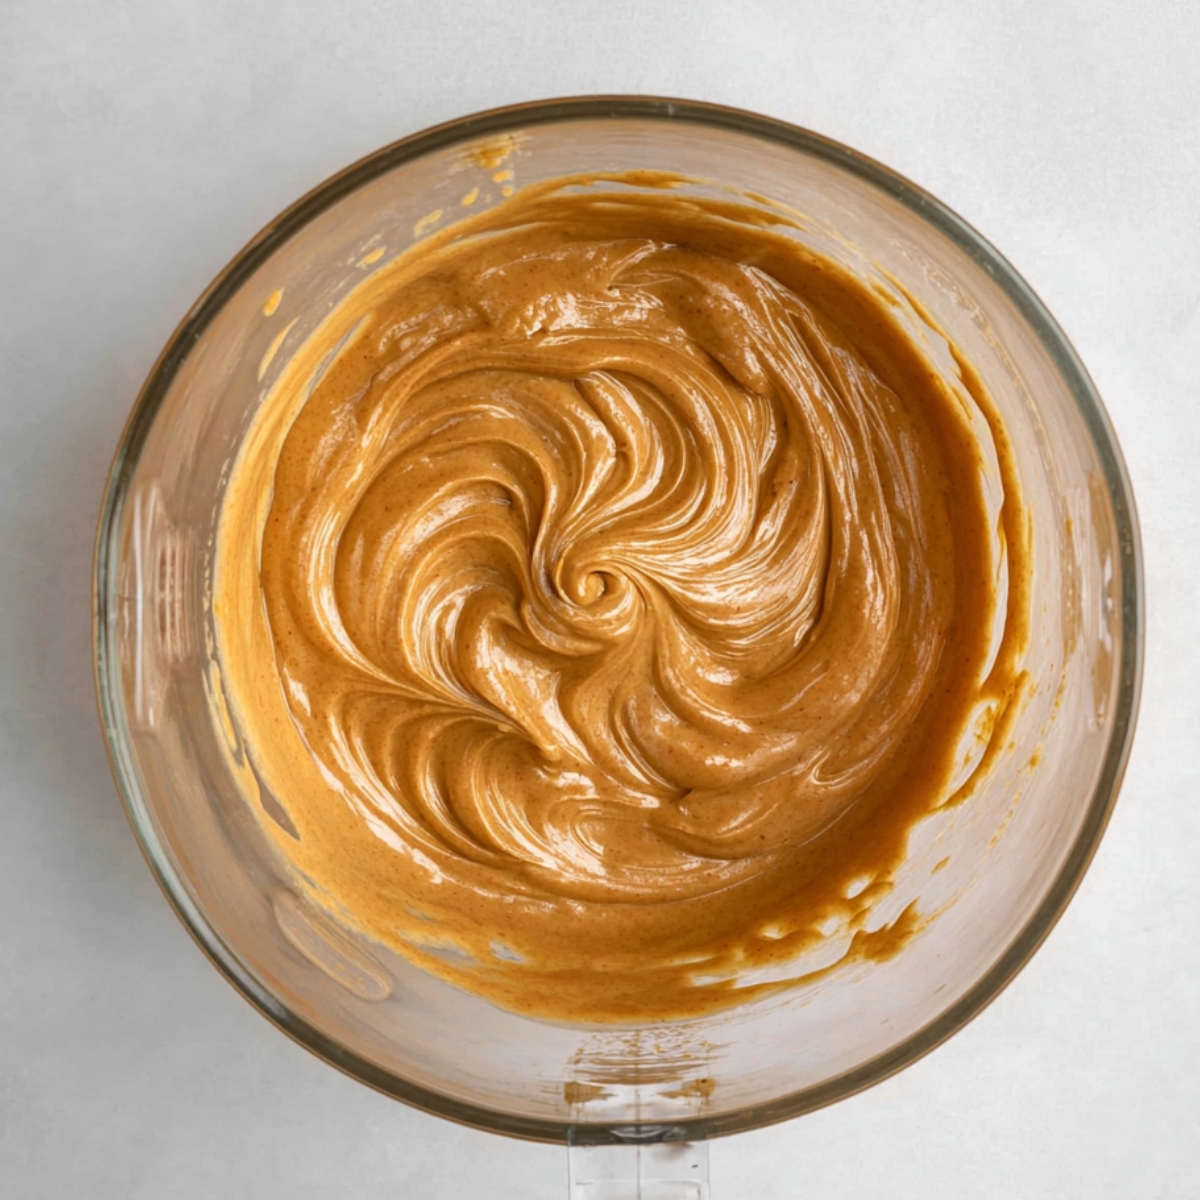
Add the sugar: Slowly add the powdered sugar in batches, mixing on low speed to avoid a sugar cloud in your kitchen. Scrape down the sides of the bowl as you go to make sure everything's blended evenly.
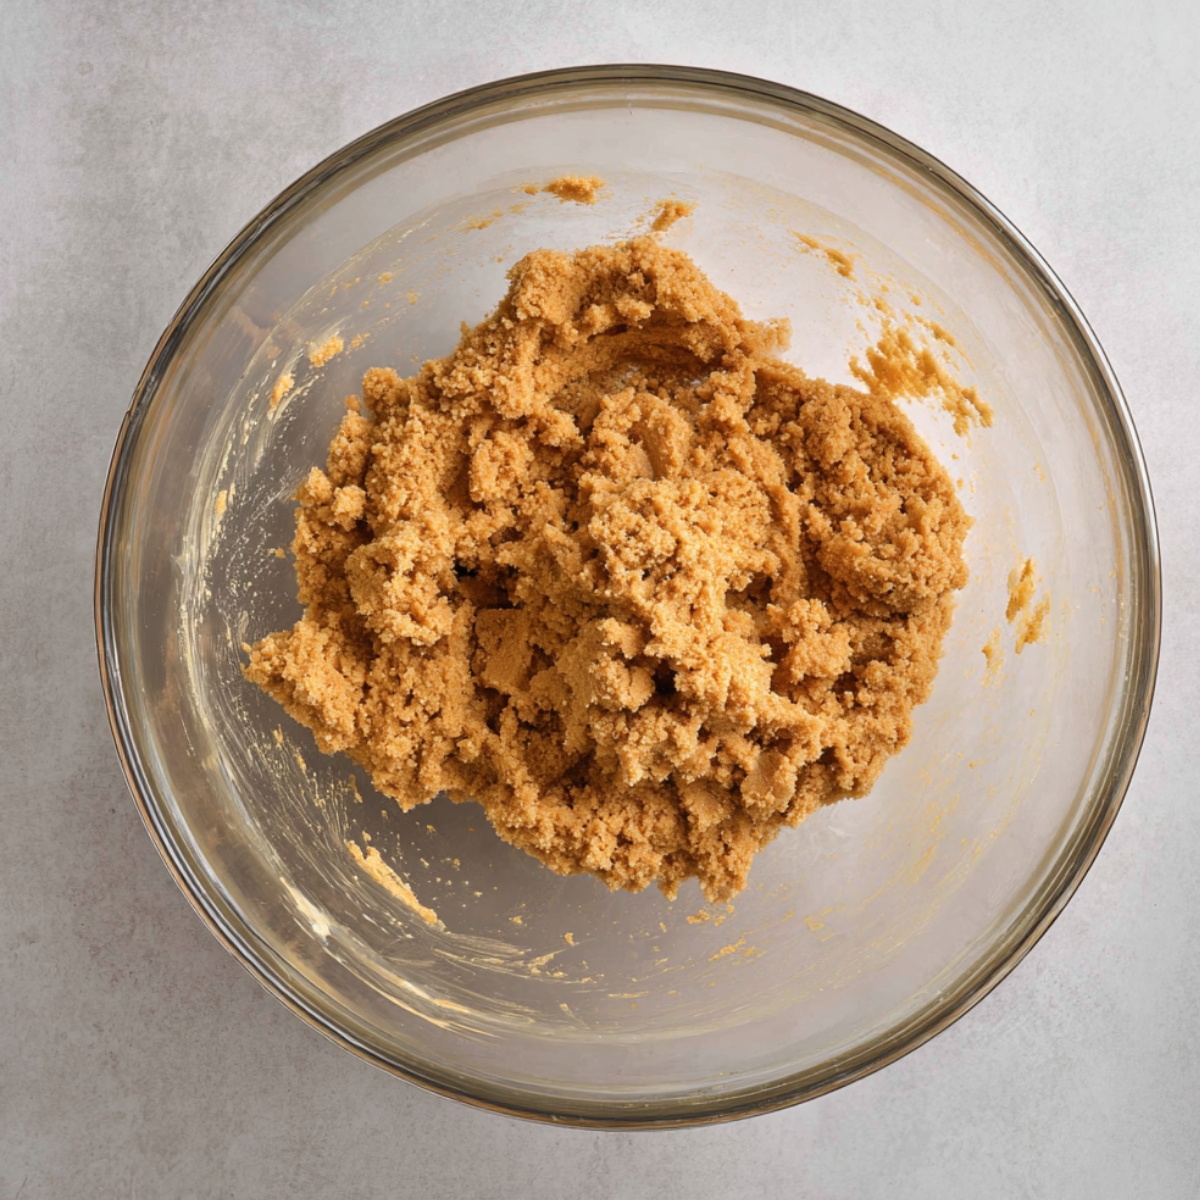
Fold in the mix-ins: Gently stir in the graham cracker crumbs and crushed Butterfingers until just combined. The mixture should look thick and slightly crumbly but hold together when pressed.
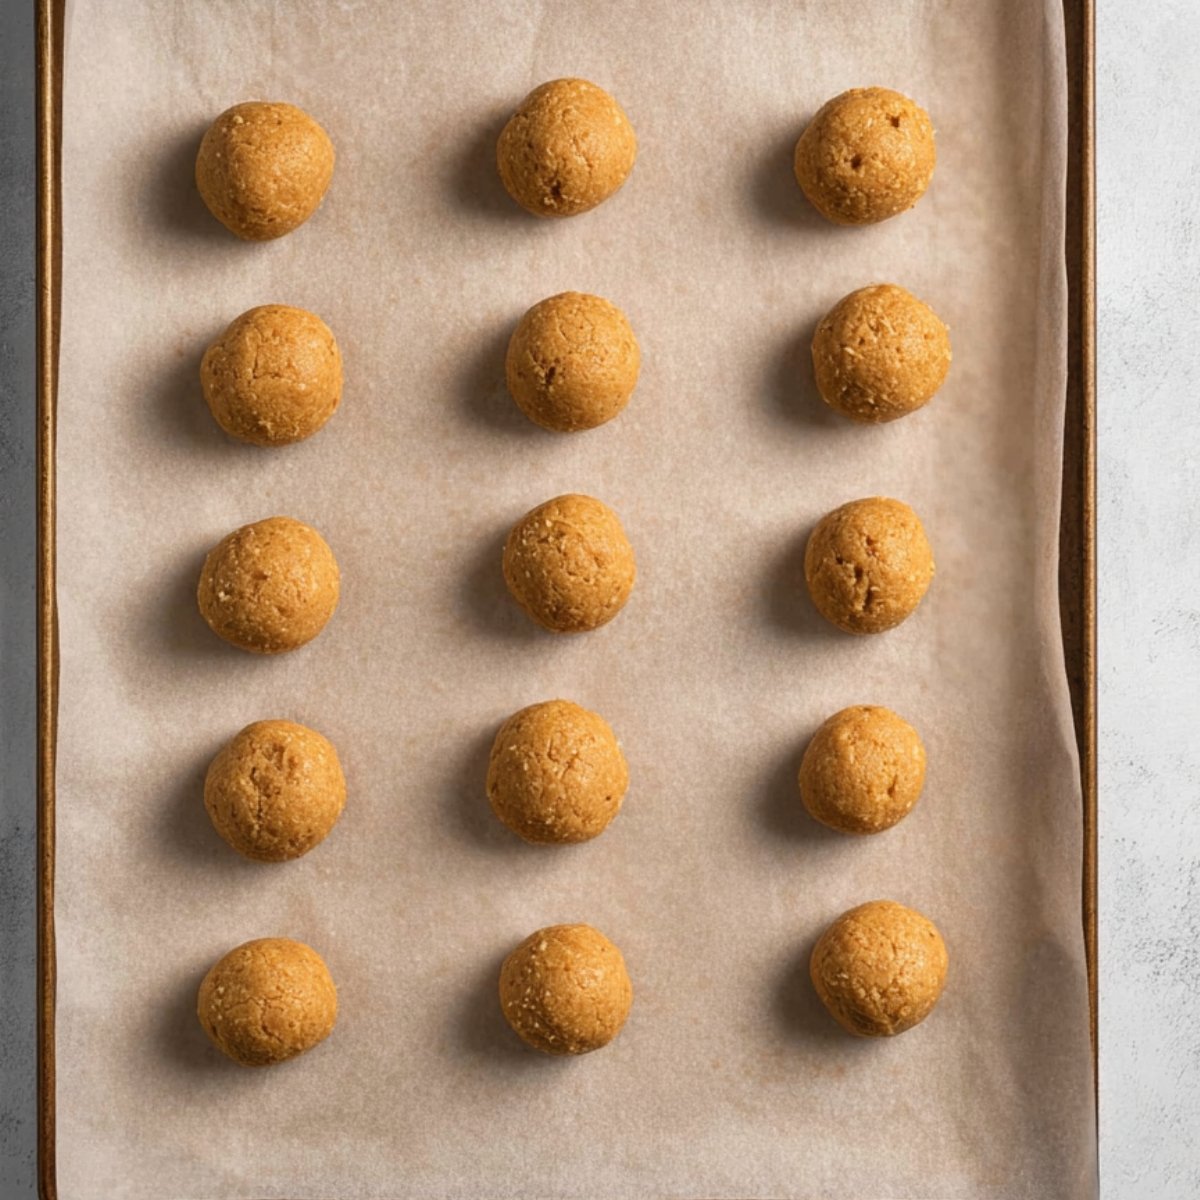
Shape and chill: Line a large cookie sheet with parchment paper. Scoop out 1 to 1½ tablespoons of the mixture and roll it between your palms into a smooth ball. Place each ball on the prepared sheet, spacing them about an inch apart. Pop the whole tray into the freezer for 30 minutes to firm up completely.
Melt the chocolate: Once the balls are chilled, melt the chocolate in a microwave-safe bowl. Use 30-second intervals at 50% power, stirring between each round. Stop when a few small chunks remain and stir until fully melted and smooth. You can also use a double boiler over low heat if you prefer.
Dip and decorate: Use a spoon or fork to dip each ball into the melted chocolate. You can coat them fully or leave a little of the peanut butter mixture peeking through for a rustic look. Place the dipped balls back on the parchment paper and immediately sprinkle with extra crushed Butterfingers, holiday sprinkles, or a pinch of flaky sea salt while the chocolate is still wet.
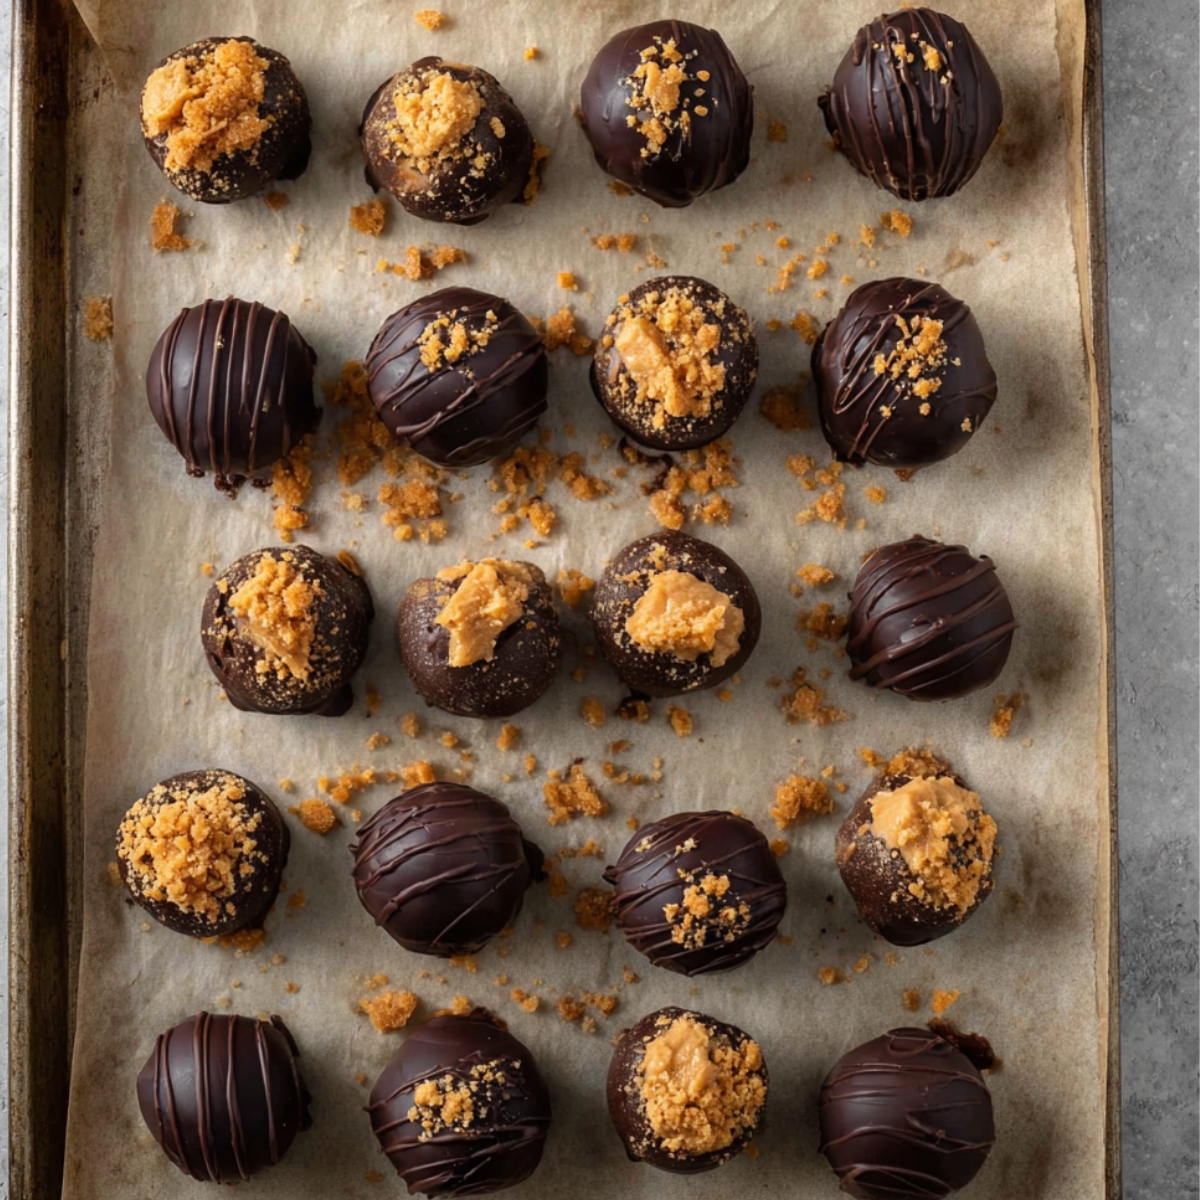
Let them set: Allow the chocolate to set completely at room temperature or pop them in the fridge for faster results. Once firm, they're ready to serve or store.
Substitutions and Variations
Here are a few ways to customize these Butterfinger Balls based on what you have on hand.
Swap the candy: Use crushed Reese's cups, Snickers, or Milky Way bars instead of Butterfingers for a different flavor twist.
Make them nut-free: Replace the peanut butter with sunflower seed butter and use a nut-free candy bar if needed.
Change the coating: Try white chocolate, dark chocolate, or even a mix of both for a marbled effect.
Add mix-ins: Stir in mini chocolate chips, crushed pretzels, or Rice Krispies for extra texture.
Skip the graham crackers: You can use crushed vanilla wafers or Nilla wafers in place of graham cracker crumbs.
Equipment For Butterfinger Balls
Here's what makes this Butterfinger Balls come together smoothly.
- Medium mixing bowl: For blending the peanut butter mixture.
- Electric hand mixer or stand mixer: Creams the butter and peanut butter together quickly and evenly.
- Rubber spatula: Helps you scrape down the sides and fold in the mix-ins.
- Measuring cups and spoons: Keeps your ingredient ratios accurate.
- Large cookie sheet: Holds all the balls while they chill.
- Parchment paper: Prevents sticking and makes cleanup easy.
- Microwave-safe bowl: For melting the chocolate. A double boiler works too if you prefer stovetop melting.
- Spoon or fork: Makes dipping the balls into chocolate easier and less messy.
Storage and Make-Ahead Tips
These Butterfinger Balls store beautifully, making them perfect for holiday prep.
Refrigerator: Keep them in an airtight container for up to one week. The chocolate stays firm, and the filling keeps its creamy texture.
Freezer: You can freeze these for up to three months. Layer them between sheets of parchment paper in a freezer-safe container, then thaw in the fridge before serving.
Make-ahead: Roll and freeze the balls before dipping them in chocolate. When you're ready, let them thaw slightly, then dip and decorate. This works great if you're making a big batch for a party.
Gifting: Pack them in a small box lined with tissue paper or a clear bag tied with ribbon. They make a sweet homemade gift that everyone loves.
Serving Suggestions
Here are a few cozy ways to enjoy these Butterfinger Balls.
Serve them on a dessert platter alongside Lemon Swiss Roll Recipe and Best Key Lime Cake Recipe for a colorful spread.
Pair them with hot cocoa or coffee for an afternoon treat that feels indulgent but simple.
Add them to a holiday cookie tray with other no-bake favorites for a mix of textures and flavors.
Pack a few in your kid's lunchbox as a special surprise, or bring them to a potluck where they'll disappear fast.
Expert Tips
Use room-temperature butter so it blends smoothly with the peanut butter. Cold butter will leave lumps.
Don't skip the chilling step. If the Butterfinger Balls aren't firm enough, they'll fall apart when you dip them in chocolate.
Melt the chocolate slowly and stir often. Overheating can make it seize up and turn grainy.
If the chocolate starts to thicken while you're dipping, pop it back in the microwave for 10 seconds and stir.
Add the garnishes right after dipping while the chocolate is still wet, so they stick properly.
For the smoothest coating, use chocolate bark instead of chocolate chips. It melts beautifully and sets with a glossy finish without tempering.
FAQ
Why did Butterfinger get discontinued?
Butterfinger hasn't been discontinued. The recipe was changed in 2019 by Ferrero, the new owner, which gave the candy a slightly different taste and texture. Some people prefer the original, but Butterfingers are still widely available. If you want that classic flavor in these Butterfinger Balls, crush up the bars and mix them right into the filling.
What is the crunchy stuff in Butterfingers?
The crunchy center of a Butterfinger is made from a peanut butter-flavored compound that's layered and then broken into flaky pieces. It's coated in chocolate to create that signature texture. When you crush Butterfingers for this recipe, you get those same sweet, crispy bits in every bite.
What exactly is the inside of a Butterfinger?
The inside is a crispy, flaky peanut butter candy that's been made by layering a peanut butter mixture until it hardens into thin, crunchy sheets. It's different from smooth peanut butter cups because of the texture. In these Butterfinger Balls, that crunch adds a fun contrast to the creamy peanut butter filling.
What is an American Butterfinger?
Butterfinger is an American candy bar made by Ferrero. It has a crispy peanut butter center covered in milk chocolate and has been around since 1923. It's a popular Halloween and movie theater candy in the U.S. These no-bake Butterfinger balls take that same flavor and turn it into a homemade treat you can make any time.
Related
Looking for other recipes like this? Try these:

Pairing
These are my favorite dishes to serve with Butterfinger Balls

Butterfinger Balls
Ingredients
- 1 cup plus 2 tablespoons creamy peanut butter regular shelf-stable not natural for best texture
- 4 ½ tablespoons butter softened to room temperature for easy mixing
- 1 ⅛ teaspoons vanilla extract pure vanilla for warmer flavor
- 1 cup plus 2 tablespoons powdered sugar sifted to avoid lumps
- ¾ cup plus 2 tablespoons graham cracker crumbs finely crushed for smooth balls
- ½ cup plus 1 tablespoon crushed Butterfinger candy bars crushed into small crunchy bits
- 9 ounces chocolate bark or chocolate chips good-quality for smoother melting
- 2 tablespoons extra crushed Butterfinger or sprinkles or flaky salt for topping and decoration
Instructions
- Beat the peanut butter and softened butter together in a medium bowl until smooth and fully blended.
- Pour in the vanilla and mix again until it disappears into the mixture.
- Add the powdered sugar a little at a time, mixing on low speed and scraping the bowl as needed until thick and smooth.
- Gently fold in the graham cracker crumbs and crushed candy until evenly distributed.
- Line a large baking sheet with parchment and scoop out portions of the mixture, about 1 to 1 ½ tablespoons each.
- Roll each portion between your hands to form smooth, round balls and place them back on the sheet.
- Transfer the tray to the freezer and chill until the balls are firm all the way through.
- Place the chocolate in a microwave-safe bowl and heat in short intervals, stirring often, until mostly melted, then stir until completely smooth.
- Dip each chilled ball into the melted chocolate, coating fully or leaving a small spot of filling peeking through if you like.
- While the coating is still wet, sprinkle the tops with extra crushed candy, sprinkles, or flaky salt.
- Let the chocolate set completely at room temperature or in the fridge before serving.
Leave a Reply