Last Thursday night, I was staring into the fridge at 5:30 with no dinner plan.oliver had just gotten home from baseball practice, hungry and cranky, and I had exactly 30 minutes before we needed to head out for his school's science fair. In desperate mom mode, I grabbed some leftover rotisserie chicken, tortillas, and cheese - but instead of making basic wraps, I remembered the garlic butter I'd made for weekend garlic bread. That split-second decision turned into these cheesy garlic chicken wraps that oliver now requests three times a week!

Why You'll Love These Cheesy Garlic Chicken Wraps
I discovered these Cheesy Garlic Chicken Wraps by complete accident last fall when our kitchen renovation took three weeks longer than promised. With just a microwave and panini press in our makeshift dining room kitchen, I was running out of ideas that didn't involve takeout. The night I threw together leftover grilled chicken with cheese and a quick garlic butter spread, something magical happened -oliver cleaned his plate without a single complaint, then looked up and asked, "Can we have these again tomorrow?"
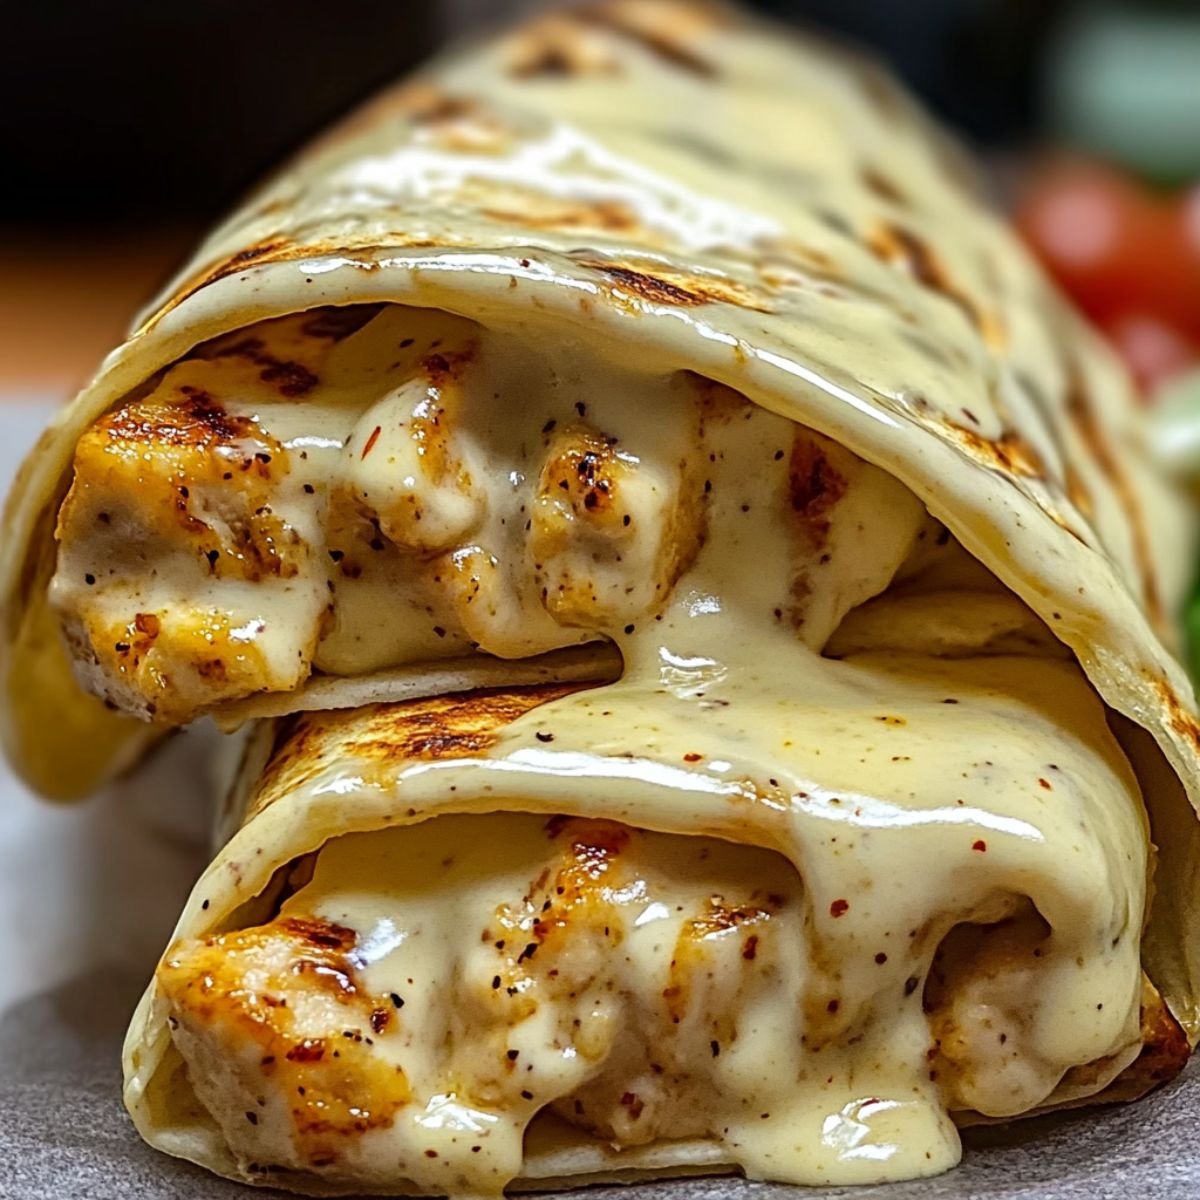
The real beauty of these Cheesy Garlic Chicken Wraps is how they transform basic ingredients into something that feels special. The first time I made them for my mother-in-law (who's notoriously picky about "shortcut cooking"), she asked for the recipe, convinced there was some secret ingredient. There isn't - just good quality basics combined in a way that makes every bite perfect. The garlic butter gets all toasty and fragrant when the wrap hits the pan, the cheese melts into gooey pockets around the chicken, and the whole thing comes together in less time than it takes to order delivery.
Jump to:
- Why You'll Love These Cheesy Garlic Chicken Wraps
- Cheesy Garlic Chicken Wraps Ingredients
- How To Make Cheesy Garlic Chicken Wraps
- Equipment For Cheesy Garlic Chicken Wraps
- Cheesy Garlic Chicken Wraps Variations
- Substitutions
- Storage Tips
- Top Tip
- Aunt Secret Worth Sharing About Cheesy Garlic Chicken Wraps
- FAQ
- Your Family's New Favorite Dinner!
- Related
- Pairing
- Cheesy Garlic Chicken Wraps
Cheesy Garlic Chicken Wraps Ingredients
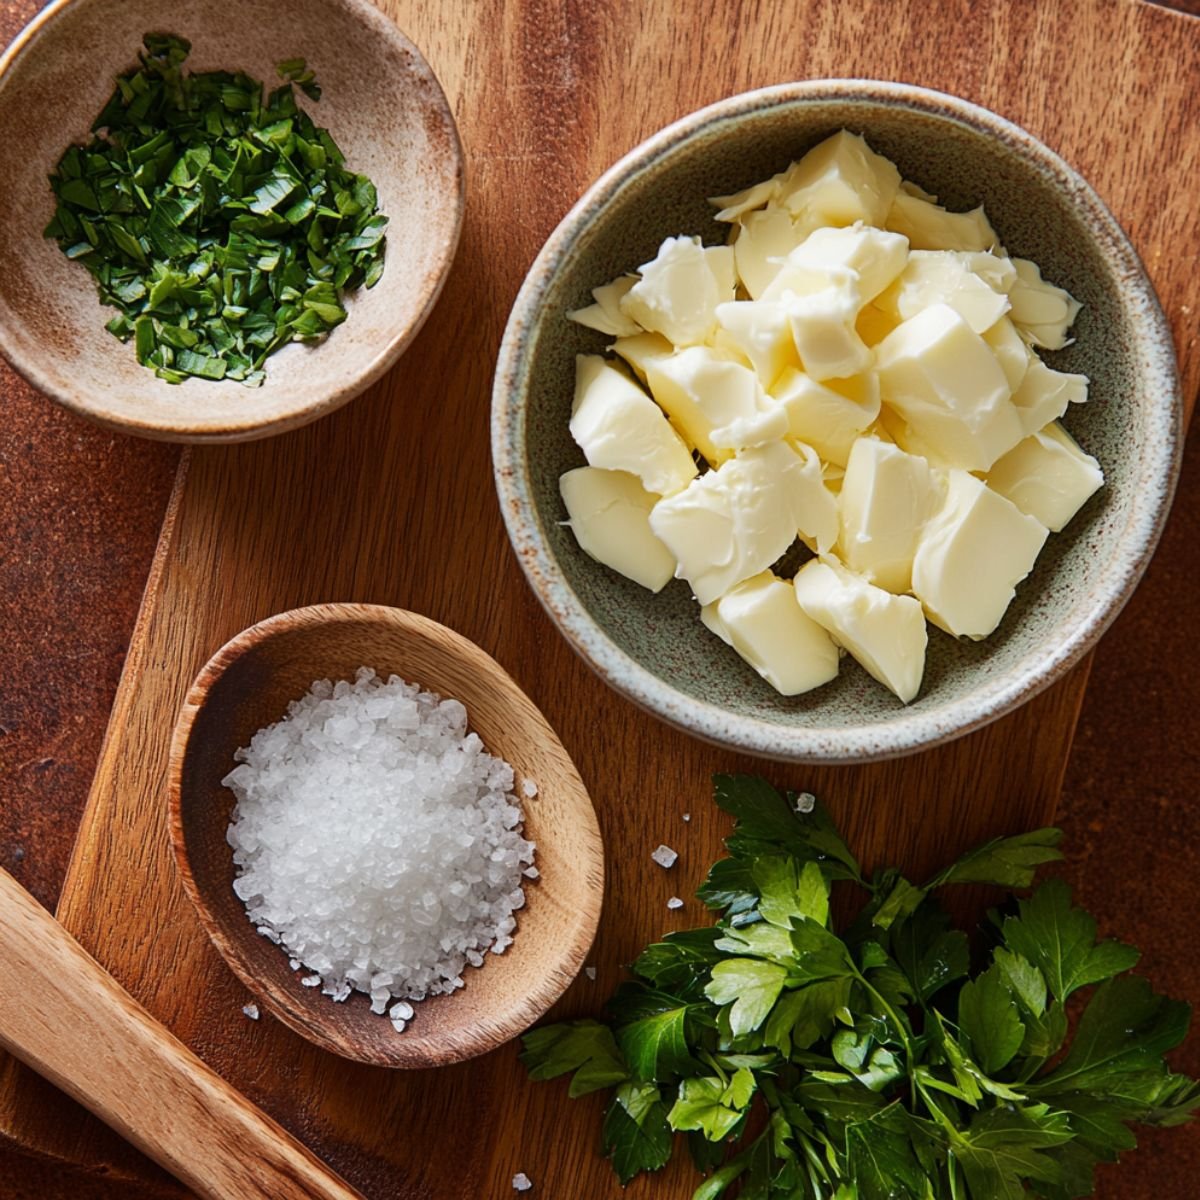
For the Garlic Butter Spread:
- Butter, softened
- Garlic cloves, finely minced
- Fresh parsley, chopped
- Pinch of salt
- Sprinkle of Italian seasoning
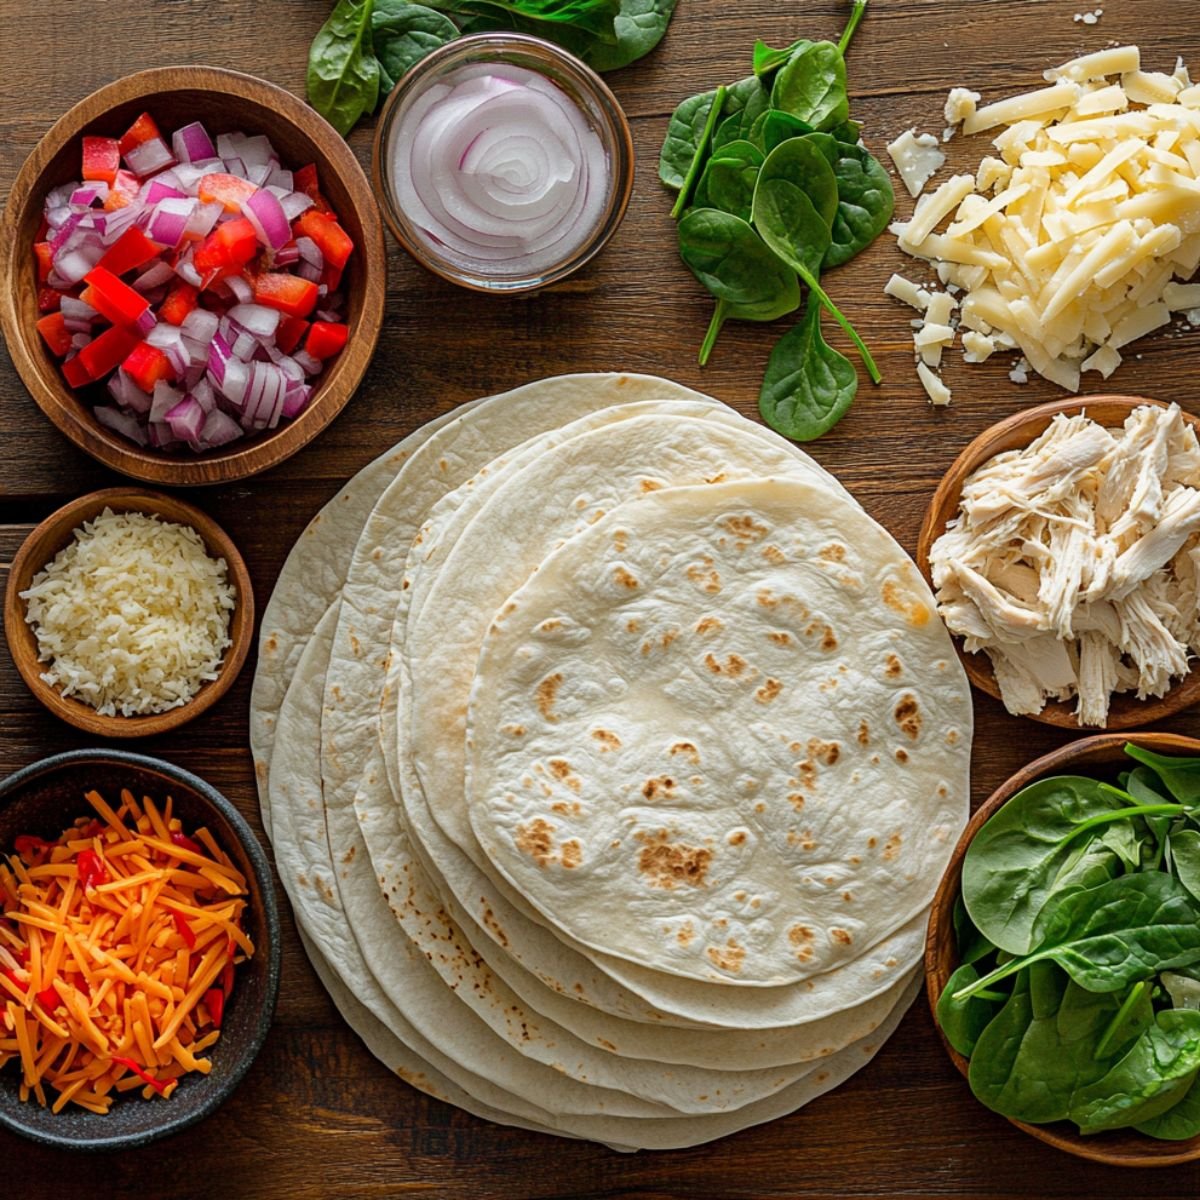
For the Wraps:
- Large flour tortillas
- Cooked chicken, shredded or diced
- Shredded cheese
- Grated parmesan
- Optional: diced bell peppers, red onion, or spinach
See recipe card for quantities.
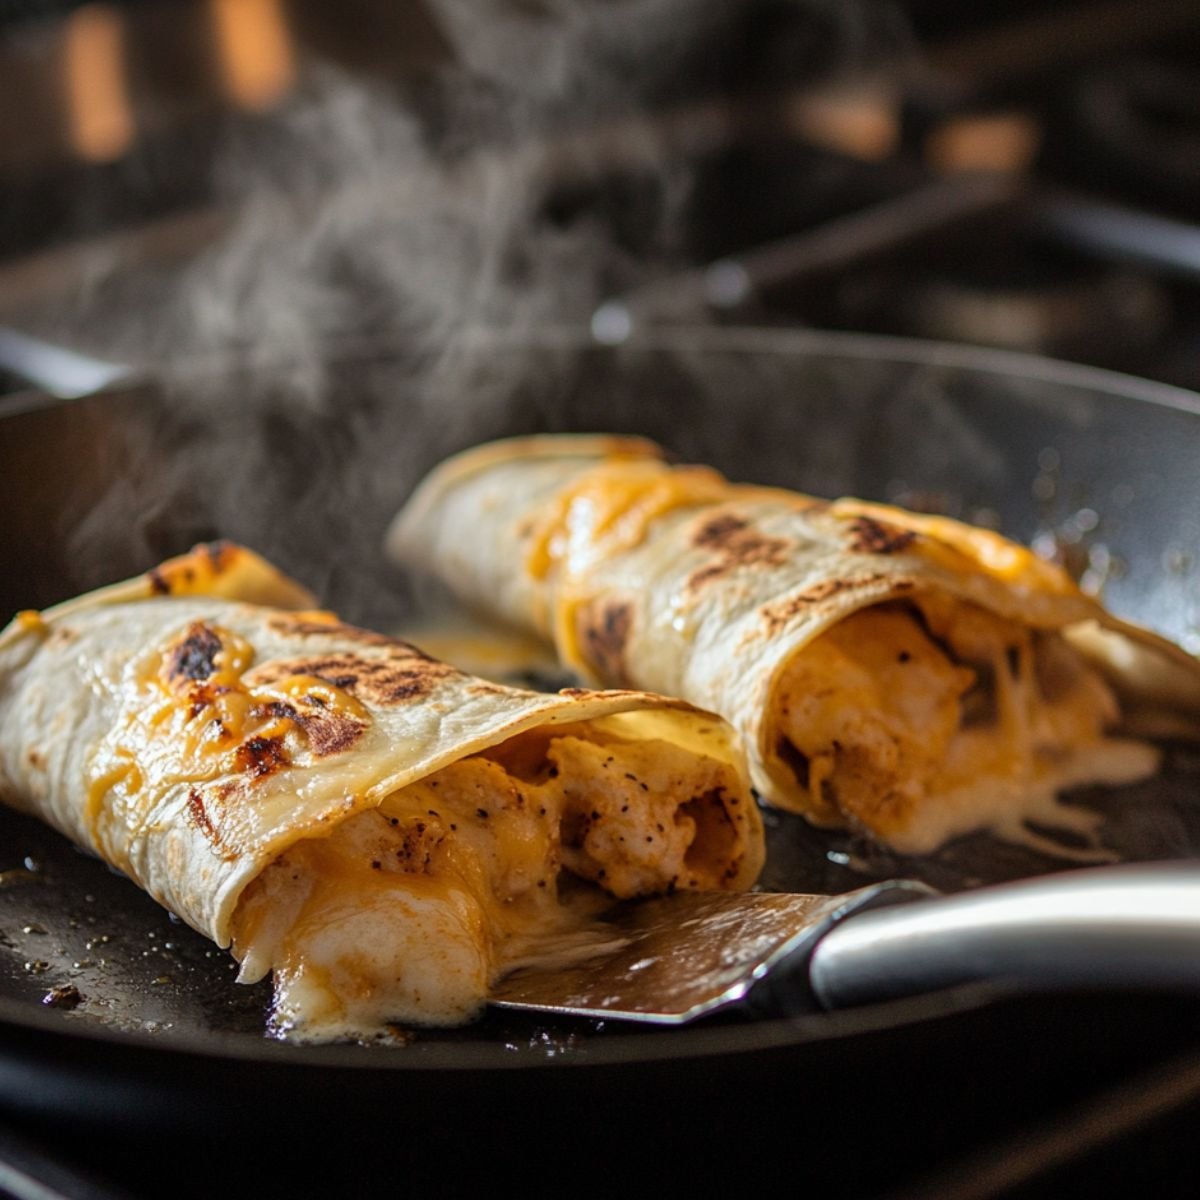
How To Make Cheesy Garlic Chicken Wraps
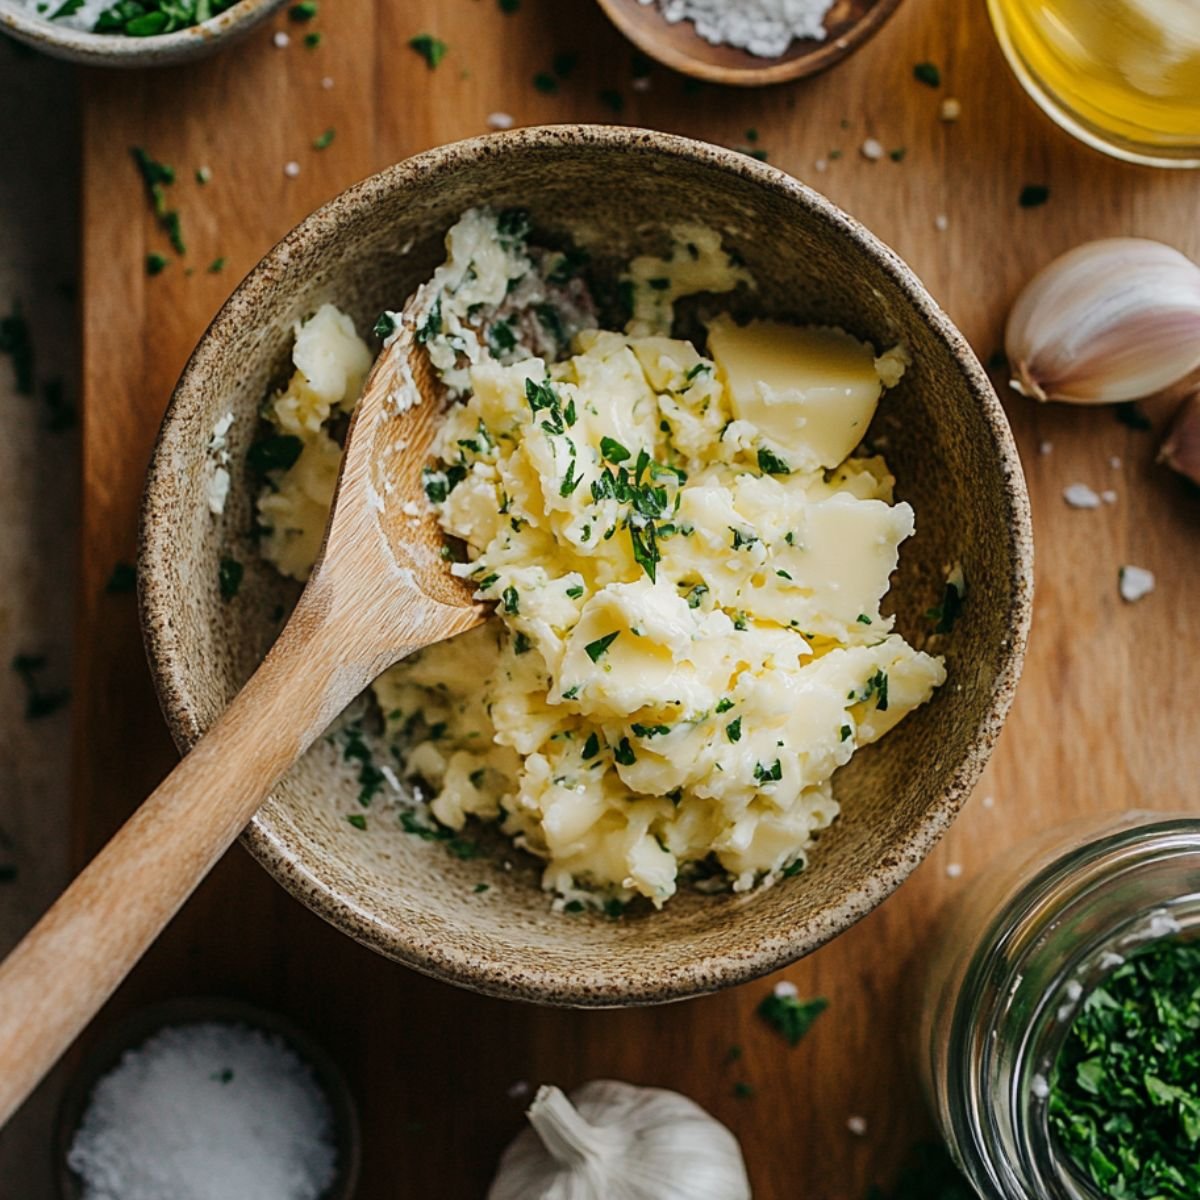
Prep the Garlic Butter:
- Mix softened butter with minced garlic
- Stir in parsley, salt, and Italian seasoning
- Set aside (or make ahead and refrigerate)
Assemble the Wraps:
- Lay tortillas flat on a clean surface
- Spread garlic butter evenly on each tortilla
- Add shredded chicken to one half
- Sprinkle with cheeses and any extra fillings
- Fold tortilla over into a half-moon shape
Cook to Crispy Perfection:
- Heat a large skillet over medium heat
- Place assembled wraps in pan (2 at a time)
- Cook 2-3 minutes until golden and crispy
- Flip carefully and cook other side
- Look for melted cheese and golden spots
Serve and Enjoy:
- Remove from pan and let cool slightly
- Cut each wrap in half (diagonal looks fancier!)
- Serve with optional dipping sauce
- Watch them disappear in minutes!
Equipment For Cheesy Garlic Chicken Wraps
- Large skillet or griddle
- Spatula
- Cutting board and knife
- Mixing bowl
- Measuring spoons
- Cheese grater
Cheesy Garlic Chicken Wraps Variations
Our family has experimented with dozens of variations over the months. Here are our favorites:
Buffalo Chicken Version:
- Add buffalo sauce to shredded chicken
- Use blue cheese or ranch instead of garlic butter
- Add diced celery for crunch
- Serve with extra buffalo sauce for dipping
Mexican-Inspired:
- Mix taco seasoning with the chicken
- Add black beans and corn
- Use Mexican cheese blend
- Top with avocado slices after cooking
Pizza Lovers' Dream:
- Spread pizza sauce under the garlic butter
- Add pepperoni slices with the chicken
- Sprinkle with Italian seasoning
- Serve with warm marinara for dipping
Breakfast Wraps:
- Substitute scrambled eggs for chicken
- Add crispy bacon pieces
- Use hash browns instead of extra veggies
- Make the night before for quick morning reheating
Veggie Packed:
- Add spinach, diced peppers, and mushrooms
- Use rotisserie chicken with Italian seasoning
- Mix in sundried tomatoes for extra flavor
- Great for sneaking in veggies for picky eaters
Substitutions
Over the years, we've made these Cheesy Garlic Chicken Wraps with all sorts of substitutions when the fridge was running low. Here are the swaps that work beautifully:
Protein Options:
- Rotisserie chicken → Leftover turkey
- Chicken → Ground beef or taco meat
- Chicken → Deli turkey or ham
- Chicken → Black beans (for vegetarian version)
- Chicken → Scrambled eggs
Cheese Choices:
- Cheddar/mozzarella → Monterey Jack
- Regular cheese → Dairy-free alternatives
- Parmesan → Romano or Asiago
- Shredded cheese → Sliced cheese
- Any cheese → Whatever is in your fridge!
Tortilla Alternatives:
- Flour tortillas → Whole wheat tortillas
- Regular tortillas → Gluten-free wraps
- Large tortillas → Street taco size (for kid portions)
- Tortillas → Flatbread
- Tortillas → Lavash bread
Butter Variations:
- Regular butter → Plant-based butter
- Butter → Olive oil (not quite as rich but works)
- Fresh garlic → Garlic powder (use ¼ teaspoon per clove)
- Fresh herbs → Dried herbs (use ⅓ the amount)
Storage Tips
Refrigerator Storage (1-2 days):
- Let wraps cool completely
- Wrap individually in aluminum foil
- Store in airtight container
- Keep any dipping sauces separate
Freezer Magic (up to 3 months):
- Wrap each cooled wrap in plastic wrap
- Place in freezer bag, removing excess air
- Label with date
- Thaw overnight in fridge before reheating
Best Reheating Methods:
- Skillet: Low heat, covered, 2-3 minutes per side
- Oven: 350°F for 10-12 minutes from refrigerated
- Microwave: Last resort! 30-second intervals between paper towels
- Air fryer: 350°F for 3-4 minutes (our newest discovery - amazing results!)
Top Tip
The Double Butter Secret This one changed everything. Instead of just spreading garlic butter inside the Cheesy Garlic Chicken Wraps, I now use a tiny bit on the outside too. This happened by accident when oliver was "helping" in the kitchen and got butter on both sides of his tortilla. When I cooked it, that outside butter created this incredible golden crust that was even better than a restaurant's. Now I deliberately use this "mistake" every time - just a light smear on the outside before it hits the pan.
The Low and Slow Trick After burning the first batch I made for my in-laws (talk about embarrassing), I discovered that patience pays off. Medium-low heat for a slightly longer cook time gives you that perfect crispy exterior without any scorched spots. It takes maybe 2 extra minutes, but the difference is night and day. The cheese melts completely, the tortilla gets evenly golden, and the garlic becomes fragrant without burning.
Aunt Secret Worth Sharing About Cheesy Garlic Chicken Wraps
I've gone back and forth about whether to share this family cooking secret for these cheesy garlic chicken wraps. Not because I want to keep it to myself, but because my Aunt Maggie swore me to secrecy with that intense look she gets when she's dead serious about something. But last month when she came to visit and saw me making these cheesy garlic chicken wraps for oliver's friends, she finally gave me permission to "pass along the family legacy," as she dramatically put it.
Aunt Maggie isn't just any home cook. For twenty-seven years, she ran The Lunch Counter, a tiny but beloved café in our hometown that had lines out the door every single day. When she finally retired and sold the business three years ago, the local paper did a front-page story about it. Her café was famous for simple food made extraordinary through little techniques she guarded like state secrets - and her version of cheesy garlic chicken wraps had a cult following.
FAQ
How do you keep the wraps from getting soggy?
The key is controlling moisture! I always pat the chicken dry before adding it, and if I'm using veggies like tomatoes or peppers, I give them a quick pat with paper towels too. Also, the garlic butter creates a slight barrier on the tortilla that helps prevent sogginess. If making ahead, cool completely before wrapping to prevent condensation.
Can I make these in advance for a party?
Absolutely! I've done this for oliver's birthday and for game nights. Assemble them completely, then refrigerate unwrapped on a baking sheet. When guests arrive, just cook them fresh. Or, cook completely, arrange on a baking sheet, and keep warm in a 200°F oven for up to 30 minutes. They stay crispy surprisingly well!
What's the best cheese to use?
We've tried about every cheese in our grocery store, and the best combo is a mix of mozzarella for that perfect cheese pull and cheddar for flavor. Pre-shredded works fine if you're short on time, but freshly grated melts more smoothly. Pepper jack adds a nice kick if you like things spicy. The only one that disappointed was American - it got too melty.
How do you get kids to eat these?
In my experience with oliver and his friends, involvement equals enthusiasm. Let them spread the butter or sprinkle the cheese. I also find that cutting them into quarters makes them more approachable for little hands, and offering dipping sauces (ranch, marinara, honey mustard) gets even picky eaters on board. The name matters too - we call them "pizza wraps" for oliver's friends!
Your Family's New Favorite Dinner!
These cheesy garlic chicken wraps have become such a staple in our weekly rotation that oliver now proudly tells his friends his mom makes "the best wraps in the universe." From busy sports nights to casual weekend lunches, this simple recipe delivers restaurant-quality results in minutes. The combination of that incredible garlic butter, tender chicken, and gooey cheese wrapped in a crispy tortilla creates something truly special from everyday ingredients.
Looking for more quick family favorites that deliver big flavor? Our Easy Chopped Italian Sandwich layers colorful Italian meats and cheeses with a zesty vinaigrette for the perfect make-ahead lunch or picnic dish. For a dinner that tastes like you spent hours in the kitchen, try our Easy Honey Garlic Pork Tenderloin that creates a sticky-sweet glaze everyone will fight over. And when you need an appetizer that disappears in minutes, our Easy Garlic Parmesan Cheeseburger Bombs combine all the flavors of a perfect burger in a poppable, dippable party bite.
Don't forget to share your cheesy garlic chicken wraps creations with us! in your photos and let us know any special twists you added to make them your own. As oliver would say, "Sharing good food is the best way to make new friends!"
Rate this Cheesy Garlic Chicken Wraps
Related
Looking for other recipes like this? Try these:
Pairing
These are my favorite dishes to serve with Cheesy Garlic Chicken Wraps
Cheesy Garlic Chicken Wraps
Equipment
- Large skillet (Or griddle)
- Spatula (For flipping wraps)
- Cutting board (For prep)
- Knife (For cutting chicken/vegetables)
- Mixing bowl (For garlic butter)
- Measuring spoons (For seasoning the garlic butter)
- Cheese grater (Optional, for fresh grated cheese)
Ingredients
For Garlic Butter:
- 4 tablespoon Butter - Softened
- 3 Garlic cloves - Finely minced
- 1 tablespoon Parsley - Chopped, fresh
- 1 pinch Salt
- 1 dash Italian seasoning - Optional
For Wraps:
- 4 Flour tortillas - Large size
- 2 cups Cooked chicken - Shredded or diced
- 1.5 cups Shredded cheese - Mozzarella/cheddar mix ideal
- 0.25 cup Parmesan cheese - Grated
- Optional add-ins - Diced peppers, onion, spinach
Instructions
- Mix softened butter with minced garlic, parsley, salt, and Italian seasoning. Set aside.
- Lay tortillas flat. Spread garlic butter on one side. Add chicken and cheeses to one half, plus any extra veggies. Fold into a half-moon shape.
- Heat skillet over medium-low. Place wraps butter-side-down. Cook 2-3 mins per side, until golden and crispy. Flip carefully.
- Let cool slightly, then slice each wrap in half. Serve with dipping sauces like ranch or marinara.
- Assemble wraps in advance and refrigerate. Cook fresh when ready to serve or keep warm in a low oven.

Leave a Reply